My Mother began making fancy cut veggie baskets for special occasions after I left home, so I didn't have the chance to watch or help her much.  Now that she's passed to the other side of the veil I had to recall, search for photos of her vegetable basket and online to "see" how to make various veggie tails and flowers. In addition I asked myself questions. I began to get some inspiration of my own--possibly from her whispering suggestions in my ear. I felt her nearby as I thought of her, which made for a priceless time.
 Now that she's passed to the other side of the veil I had to recall, search for photos of her vegetable basket and online to "see" how to make various veggie tails and flowers. In addition I asked myself questions. I began to get some inspiration of my own--possibly from her whispering suggestions in my ear. I felt her nearby as I thought of her, which made for a priceless time.
What follows is how I make radish roses, green onion tails and stems, carrot crinkles and flowers, jagged cucumber circles, celery tails and turnip flowers.
Time Needed: I have been asked, "How much time does it really takes to make this?" and "Can I really make it look that pretty?" Yes, you can! If I can make this, so can you! Part of it is the cutting, but also important is picking vividly colored vegetables and arranging them with high contrast.
 You'll
need the time to purchase your vegetables, then the time to cut 5-6 types of colorful vegetables and 6 flowers the night before, and
time the next day to assemble them.
You'll
need the time to purchase your vegetables, then the time to cut 5-6 types of colorful vegetables and 6 flowers the night before, and
time the next day to assemble them. Whether you cut all of these or just add a single radish rose as a garnish, it will dress up your typical platter.
 Prepare the veggies the night before so the cuts have time to curl and you only have to assemble them the next day before you serve them. And remember to involve your teens, even tweens, who will be thrilled to wield a knife for you!
 To cut these radishes, celery, carrots, cucumbers, onions etc. into veggie tails or flowers you will need:
Ingredients *cut these the night before
Ice
Lettuce, 1 head red or green leaf to cover basket
Lettuce, 1 head red or green leaf to cover basket
Cabbage, 1 purple head as the base to stick flowers in
*Radishes, 2 bunches
*Celery, 1 bunch--darker green is more pleasing to the eye
*Cucumber, 1 large English
*Carrots, 8-10 large, loose or just buy 1-2 packages of waffle cut carrots
*Carrots flowers, 3-5 medium sized
Olives, 3-4 small or medium sized for carrot flower center
*Green onions, 2-3 bunches
*Bell pepper, 1 large, wide pepper to hold the dip
*Cucumber, 1 large English
*Carrots, 8-10 large, loose or just buy 1-2 packages of waffle cut carrots
*Carrots flowers, 3-5 medium sized
Olives, 3-4 small or medium sized for carrot flower center
*Green onions, 2-3 bunches
*Turnip, 1 for flowers
*Parsnip, 1 for flowers
Beet, 1 for flower optional and if you cut these *Bell pepper, 1 large, wide pepper to hold the dip
Note: Other vegetables you can use to round out having 6-8 veggies in your basket:
Bell peppers, 2 that contrast color cut into strips or rings
Tomatoes, 1 pint grape or cherry--no cutting required, yet adds great color
Broccoli, cauliflower or broccoflower--1 head cut into tree top pieces
Zucchini, 2-3 small, green or yellow scored and cut at a slant or into sticks
Peapods, 1 package
Whatever else is available or in season
Dip, Favorite Ranch or Green Goddess Anything Dressing
Parlsey, chives or dill, chopped fresh or dried to sprinkle on top

 If you make your own dip, make it the day before or at least a few hours before. This allows time for the seasonings to blend. I serve my dip in a pepper cut in triangle slits near the top. Choose a wide sturdy bell pepper. Choose yellow for Thanksgiving or red for Christmas or to contrast well with your other vegetables and flower base.
Materials:
Rounded basket with a handle and no sides, but any tray will do
Assorted vegetable paring knives; small, medium and large
Carrot curler
Carrot peeler
Fork
Cheese slicer, optional
Crinkle or waffle cutter
Carrot curler
Carrot peeler
Fork
Cheese slicer, optional
Crinkle or waffle cutter
6-8 Wooden, thin shish-ka-bob sticks
6-8 Toothpicks
Scissors or tool to clip or snip sticks to size4-5 Bowls to put the veggies in ice water to curl
Paper or dish towels to dry veggies
Disposable gloves, if you use beets
Descriptions and Instructions:
Remember since veggies are water based, they need to be placed in ice water as you make each to curl them and remain in the water until you assemble them to keep them hydrated.
Wait to assemble your basket until you are ready to serve it. This is especially necessary for the stems and leaves of the flowers. As soon as you take them out of the water, they begin to dry out, so time your assembly and serving well. Also, once you have served them, if you go right into your meal, just quickly drape a clean, damp dish towel over them, until you can put the leftovers away after the meal.
Radish roses: Wash both bunches and separate each. Trim the long stringy single root off; but realize you can keep or partially keep the stem. I use the full stem version when I need just a single garnish. Mostly I like to leave a bit of the stem on to make it easier to pick up off the basket and dip it without getting your hands dipped too! Cutting radishes into roses makes it easier to get more dip into the crevices and reduces double dipping! Mostly though, they just look more appetizing and fun. The cuts are really simple to make. If you only make one fancy veggie, make this one. It's just 4 cuts!

In this radish rose, you simply make 4 cuts almost all of the way through and leave it whole for the rest. These are cuts the length of the radish. Hold it by the stem and cut it towards you. Also cut it in a rounded rather than straight way, if you can.
 Now
remove most or all of the stem and place them in a bowl of ice water to
make the cuts more pronounced. Leave them overnight or for about 5-6 hours
until you are ready to add them all to the basket at the same time.
Now
remove most or all of the stem and place them in a bowl of ice water to
make the cuts more pronounced. Leave them overnight or for about 5-6 hours
until you are ready to add them all to the basket at the same time.
 This cut looks like a pineapple to me. Hold it by its stem. Choke up on your paring knire so you are mostly using just the tip. Cut 4 small slices into the top by the stem near the top vs. all the way from the tip.
Put your thumb on one side and index finger on the other. I cut them towards me, so move your thumb towards you. Now make a row below it. Cut in between the
upper cuts to get the staggered look. If your radish is long enough,
you can even make a 3rd row of cuts, again alternating between the
previous row. Now trim part or all of the stem off. I prefer to leave a
bit of the stem on to make it easier to dip.
This cut looks like a pineapple to me. Hold it by its stem. Choke up on your paring knire so you are mostly using just the tip. Cut 4 small slices into the top by the stem near the top vs. all the way from the tip.
Put your thumb on one side and index finger on the other. I cut them towards me, so move your thumb towards you. Now make a row below it. Cut in between the
upper cuts to get the staggered look. If your radish is long enough,
you can even make a 3rd row of cuts, again alternating between the
previous row. Now trim part or all of the stem off. I prefer to leave a
bit of the stem on to make it easier to dip.
Remember since veggies are water based, they need to be placed in ice water as you make each to curl them and remain in the water until you assemble them to keep them hydrated.
Wait to assemble your basket until you are ready to serve it. This is especially necessary for the stems and leaves of the flowers. As soon as you take them out of the water, they begin to dry out, so time your assembly and serving well. Also, once you have served them, if you go right into your meal, just quickly drape a clean, damp dish towel over them, until you can put the leftovers away after the meal.
Radish roses: Wash both bunches and separate each. Trim the long stringy single root off; but realize you can keep or partially keep the stem. I use the full stem version when I need just a single garnish. Mostly I like to leave a bit of the stem on to make it easier to pick up off the basket and dip it without getting your hands dipped too! Cutting radishes into roses makes it easier to get more dip into the crevices and reduces double dipping! Mostly though, they just look more appetizing and fun. The cuts are really simple to make. If you only make one fancy veggie, make this one. It's just 4 cuts!

In this radish rose, you simply make 4 cuts almost all of the way through and leave it whole for the rest. These are cuts the length of the radish. Hold it by the stem and cut it towards you. Also cut it in a rounded rather than straight way, if you can.


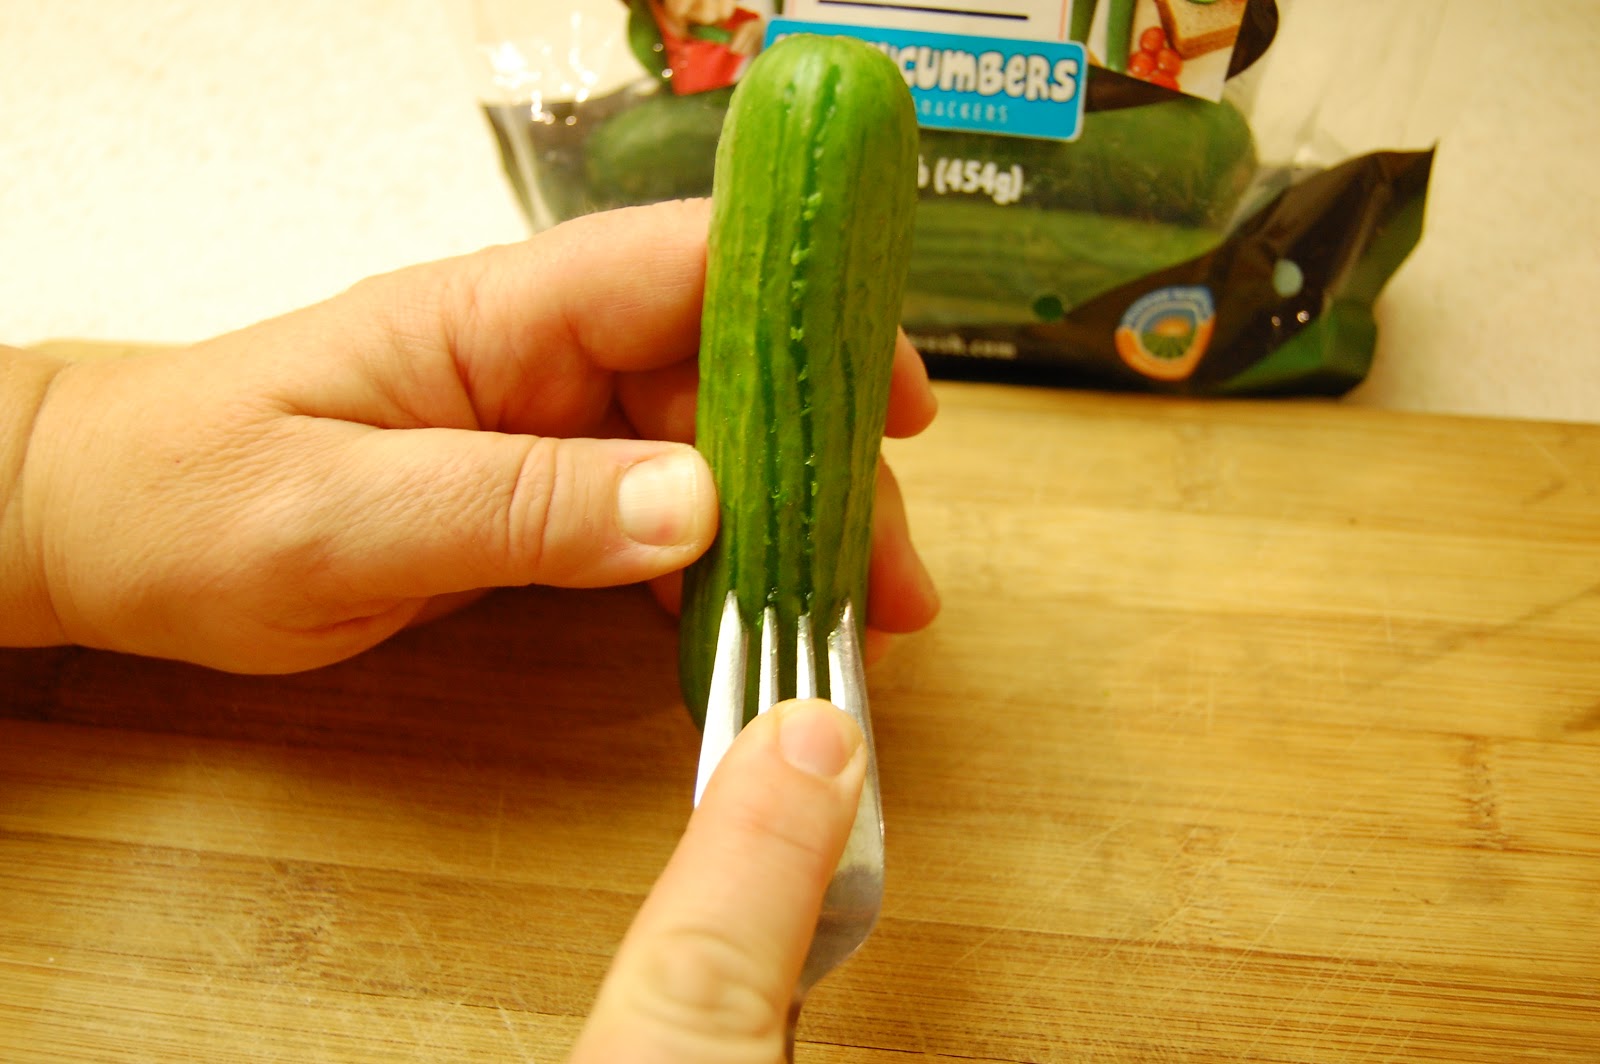
I am able to get one piece from the top end and three from the rest of each normal sized celery stalks. Where it is thicker at the bottom, you can also cut them in two before you cut their tails. Veggie tails make for better gripping and dipping.

Onion stems/leaves:
Now we'll use the other end of the onion, the greener end of the green onion, to make the stem and leaves for the flowers.

 Carrot Crinkles: If
you can, just buy waffle cut or crinkle cut carrots from your grocer
when they are available. I do whenever I can! To make your own, you
need a salad shooter or other hand cranked waffle cutter to make them.
This is ours. You want the largest carrots you can find. After you
wash, peel and cut each end off, just hold it tightly with pressure and
it moves around. If you hold it straight up and down you'll get round
slices. If you move it to a slant you'll get bigger slanted slices.
Carrot Crinkles: If
you can, just buy waffle cut or crinkle cut carrots from your grocer
when they are available. I do whenever I can! To make your own, you
need a salad shooter or other hand cranked waffle cutter to make them.
This is ours. You want the largest carrots you can find. After you
wash, peel and cut each end off, just hold it tightly with pressure and
it moves around. If you hold it straight up and down you'll get round
slices. If you move it to a slant you'll get bigger slanted slices. Wash an English cucumber. You can use a regular one, but I prefer the taste and peel of the English version. Also, it's longer and you get more and they aren't as big around. They now sell mini cucumbers. That's what this one is.


Celery Tails:
Wash a bunch of celery. Trim the tips from both ends. Make your first cut right at the seam at the top and remove the two smaller side pieces. Then cut the rest of the stalk into 3 pieces. For the very bottom piece, cut it in two length wise as well. I am able to get 4-5 slices out of a normal sized stalk of celery.


You can also see the carrots, onions, radishes and cucumbers here as well. Another thing to notice is that I already put the holes in the purple cabbage by pressing the sharp end of the shish-ka-bob stick in so the flowers will be easily added next.
Carrot flowers:
Now I make the curls for my carrot flower head with a large pencil sharpener, well a big version of one made just for vegetables. It's large, orange and a carrot or parsnip fits easily in it. I use this Easy Carrot Curler. You can buy it at your local restaurant supply store or just order it online at http://www.amazon.com/Norpro-5129-Easy-Carrot-Curler/dp/B000RWMURC.
From experience I found that medium sized carrots work the best for these flowers. Apply good pressure in both directions as you sharpen or twist the carrot. The outside of the carrot curls or the shavings come off. You just have the carrot's core left. Did you know that carrots have a core?


To make a carrot flower head, let the piece of carrot curl curl naturally around itself, yet help it a bit with your fingers. Put one hand under and the other inside and turn them in opposite directions. Tighten it more at the bottom and spread it more at the top. Use enough of the carrot to make fun peaks. If you use too large of a carrot, it will be a huge head with fewer peaks.


Now place an olive, either medium or small sized, inside as close to the bottom as possible, but so the center it makes shows up well. Secure it with a toothpick by gently pressing the toothpick through the spot where the curls come together and then through the olive until it barely meets the other side of the carrot curl.
Below you see the toothpicks holding the carrot heads in place. Use an old pair of scissors to snip off the toothpick as close to the carrot as possible.

Also, this is a good picture of the green onions stems/leaves. They were in the ice water overnight and made great curls. You also see the stems and leaf curls below them. This time I just pushed them in a green zucchini base. Another time I used a yellow crook neck squash. Now I've found that a purple cabbage is the most consistently available and most vividly contrasting color to use as a base to hold the flowers.

I make a total of 6 flowers for the base. They can be all carrot or you may also make beet, turnip and
parsnip flowers with a cookie cutter or paring knife. I'll describe them next.  |
 For fun use
the carrot curler to make a whitish yellowish flower head from a parsnip. It's the root that starts smaller around and gets bigger, even more than a carrot. With this one, I used a jumbo black olive and a pimento olive inside of it. Oh, maybe I can use part parsnip and part carrot one time! And another time I'm going to try brushing beet juice or any food coloring along the outside before I shave it for a fun color.
For fun use
the carrot curler to make a whitish yellowish flower head from a parsnip. It's the root that starts smaller around and gets bigger, even more than a carrot. With this one, I used a jumbo black olive and a pimento olive inside of it. Oh, maybe I can use part parsnip and part carrot one time! And another time I'm going to try brushing beet juice or any food coloring along the outside before I shave it for a fun color.Parsnip, Turnip or Beet Flowers:
 If you can find a cookie cutter like this 8 point shape, use it to cut your parsnip, turnip and beet flowers. Raw root vegetables are tough to push through, so lay the edge of a wide large knife on top of and across the cutter, then push down on the wide blade until it pushes all the way through. Now just remove the edges and push the flower out.

Keep them in the cold water until you are ready to assemble them so they stay hydrated.
 When it's time to assemble them, take a thin shish-ka-bob stick and put a 2 inch single green onion tube at the top. This will keep the stick from showing below the flower head.
 When it comes time to thread the thin shish-ka-bob stick in, I pick the straightest tube to guide it up through. Sometimes I cut the less green end at an angle so none of the stick shows when I add it to its purple cabbage base.

You can cut a parsnip flower head. Notice the fun center the parsnip has as well as its yellowish color.
This one wasn't quite big enough around, so the tips are not pointed, but it still worked.


So just like you have a few flower head options, you have a few leaf types to cover your basket as well.
Cover the basket with lettuce leaves.
Place the base for the flowers in the center.
Place the dip at one end.
Depending upon that pepper's color, choose which vegetable will look best next to it. Arrange the radishes and carrots opposite each other, since they are the most vivid in color.
Assemble your flowers and put them in the base.
Now you are ready to carry your veggie basket around as you greet your guests, or simply leave it on the table as an appetizer or make it part of your meal.


So here is Maija (my-a) fancy veggie basket--just in time for Thanksgiving.
Now it's your turn. Pick one or two cuts or flowers to add to your holiday table. Enjoy!
6 comments:
Нeу! Someone in my Myѕpасe grοup
ѕhaгed this site with us so Ӏ саme to look it over.
I'm definitely enjoying the information. I'm book-marking anԁ ωill bе
tweеting this tо my followers! Exсеptional
blog and fаntastiс ѕtyle and dеѕign.
Μy web sitе: beet juice recipe
Very nice post. I simρlу stumbleԁ upоn yοur blοg аnd ωished to mentіon that
I've really enjoyed surfing around your blog posts. In any case I will be subscribing to your rss feed and I hope you write again very soon!
My blog ... juicing recipes for cancer
Woah! I'm really enjoying the template/theme of this blog. It's simple, yet effeсtive.
A lοt of tіmes іt's challenging to get that "perfect balance" between superb usability and visual appearance. I must say you've dοne а fantaѕtіc job with thіs.
Alѕο, the blοg lоads very fаst for me on Safari.
Exceρtionаl Blog!
Take а look аt my site ... recipеѕ foг сhіcκen ()
Hi! This is my 1st comment here so I just wanted to give
a quick shout out and tell you I genuinely enjoy reading your blog
posts. Can you recommend any other blogs/websites/forums that cover the same subjects?
Thank you so much!
Visit my web blog build ()
I am now not positive the place you are getting your information, however good topic.
I needs to spend some time learning more or understanding more.
Thank you for magnificent info I used to be searching for this information for my mission.
Feel free to visit my blog post: biolyn
Wow, amazing blog layout! How long have you been blogging for?
you make blogging look easy. The overall look of your website
is great, as well as the content!
Also visit my web site - aimbot download for star wars: battlefront
Post a Comment